British Artillery
Next Tutorial (U.S. Artillery Doctrine)
Previous Tutorial (Russian Artillery Doctrine)
Tutorial Table of Contents
Introduction to British Artillery
As with all participants in World War I, the British had considerable experience with the calculations necessary to deliver effective indirect fire. In addition, they came up with a really simple system that used map grid references, brought about by the hyper-accurate mapping of the Ordnance Survey. Previous calculations had required that you know the position of the observer relative to the guns and the position of the target relative to the observer. Then you could use trigonometric functions to figure out where to point the guns. The map grid reference system required that you know the position of the target and the guns relative to a map and did not require the position of the observer. This decreased the time needed to deliver fire on a target to approximately 2-3 minutes from the call-for-fire to the arrival of the shells. The British sacrificed some accuracy for speed, and their larger patterns tend to be somewhat wider than those of their American cousins. This was acceptable because the aim of British artillery was often not to destroy the enemy with fire but to neutralize him to make the job of other units easier.
Although their tactics up to regimental level were established in the pre-war period and did not change much during the war, in 1941 Brig HJ Parham, the CRA (Commander Royal Artillery) of 38 Division, invented and tested new procedures for coordinating fire from higher echelon assets. These culminated in demonstrating a 144 gun concentration (approximately 6 regiments) against an opportunity target within 5 minutes of the target being called. In mid-1942 XIII Corps conducted further trials and new doctrine was issued late that year. Under the new doctrine, each Corps had an AGRA (Army Group Royal Artillery) directly attached to it, which was a brigade-sized formation comprised entirely of artillery and designed to provide swift and devastating fire support to all Allied units within its range. An AGRA in NW Europe typically consisted of one Field Regiment, four Medium Regiments and a Heavy Regiment. By 1945 these were supplemented by a Super Heavy Regiment and Land Mattress rocket launchers. AGRAs were also formed in the Mediterranean and the Far East, though composition varied.
The standardized concentrations of this new doctrine were known as Mike (regiment), Uncle (division), Victor (corps), William (army) and Yoke (army group) targets and always initiated by the radio call "Mike Target, Mike Target, Mike Target" (or Uncle, etc) that galvanized Command Posts and guns to action. This system allowed them to put vast amounts of firepower in the hands of a single Observer, combining fire from diverse missions into an overwhelming single strike (although usually in Battlefront you will not see the largest missions). This system gave them one of the two most effective artillery systems used in World War 2 (the other being that of the U.S.-partisans of both systems can conduct a theological argument about which was "best"-the Germans didn't appreciate being on the receiving end of either of them).
The British were also very skilled at preparatory barrages, and preplanned fire, and many scenarios can start with several turns of pre-planned barrages or concentrations.
British Artillery was never "in reserve", even if the combat formation it was supporting was not in contact with the enemy. It was available for use on targets within range. There were two basic command and control relationships:
- 'Under Command'; and
- 'In Support', which made firepower available, normally all guns within range, and enabled firing across divisional and higher formation boundaries. In this respect the British Artillery system was more flexible than the American, as American commanders occasionally felt proprietary towards the artillery formations assigned to them.
The consequence of these simple arrangements was highly flexible mobile firepower that could be provided where and when it was needed. 'Under Command' meant that control was centralized under the commander, while 'In Support' meant decentralization. Typically a regiment 'under command' of a division would be 'in support' to a particular brigade, but this did not prevent it firing in support of formations to its flanks.
British Artillery can be classified:
- Command - High level. The British commanded their artillery from a high level. This allowed them to share assets and prepare massive strikes.
- Control - Low-medium level. Battery Forward observers were able to order strikes from their own batteries and request strikes from almost any level in their hierarchy. Even though the ability to call for fire was limited to trained observers and officers, the British generally deployed many observers and they worked closely with the formations they were supporting.
- Communications - Good. Forward observers utilized both radios and ground lines and this allowed them to rapidly place calls-for-fire.
| Towed or Sp Gun | Template Size |
Shelling Die Roll Modifier vs. V/T,G,sV |
|---|---|---|
|
Availability: (E) = Early War (approx 1939 to 1941 or 1941 to 1942 in Far East) (M) = Mid War (approx 1941 to 1943) (L) = Late War (approx 1944 to 1945) |
||
| Land Mattress 76.2mm Rocket Launcher (L) | 2 x Large | -1/0 |
| 3.7-in. Mountain Howitzer (EML) 18-pdr Field Gun (E) M3 GMC SP 75mm Gun (ML) M1 75mmm Howitzer (ML) |
Small | -1/0 |
| 25-pdr Field Gun (EML) Bishop SP 25-pdr Field Gun (M) Sexton SP 25-pdr Field Gun (L) Priest SP 105mm Howitzer (ML) 4.2-in. Mortar (ML) |
Large | -1/0 |
| 4.5-in. QF Howitzer (E) | Large | 0/+1 |
| 4.5-in. Gun (ML) 5-in. (60-pdr) Gun (EM) |
Large | 0/+1 (+1/+2) |
| 5.5-in. Gun (ML) 6-in. (26-cwt.) Howitzer (E) 155mm Howitzer (L) |
Large | +1/+2 (+2/+3) |
| 7.2-in. Howitzer (ML) | Large | +2/+3 (+3/+4) |
| 9.2-in. BL Siege Gun (E) 12-in. BL Siege Gun (E) 8-in. Howitzer (L) 230mm Gun (L) Naval Gunfire (All Calibres) (EML) |
Large | +3/+4 (+4/+5) |
| Note that shelling patterns will not generally be used for the larger guns, except perhaps in pre-planned fire plans. Instead, their attack factors will use the concentration modifier of +1 as indicated in parentheses. | ||
Artillery observers
 The late war British artillery control system relied heavily on trained artillery observers.
Artillery Troop commanders were Captains and Lieutenants and became their battery's main observers.
They operated as either Observation Post Officers (OPO) if the battle was static or
Forward Observation Officers (FOO) otherwise. However, these were not the only spotters available.
The Battery Commander, warrant officers, and suitably experienced sergeants could also function
in this capacity when necessary. In our system, all of these different kinds of
observers are represented by generic Forward Observers (FO) or Observation Post (OP) tanks. All of these are tied into the artillery radio net and can control the special missions.
Other types of troops cannot call for fire from the higher echelon assets or call the special patterns.
The late war British artillery control system relied heavily on trained artillery observers.
Artillery Troop commanders were Captains and Lieutenants and became their battery's main observers.
They operated as either Observation Post Officers (OPO) if the battle was static or
Forward Observation Officers (FOO) otherwise. However, these were not the only spotters available.
The Battery Commander, warrant officers, and suitably experienced sergeants could also function
in this capacity when necessary. In our system, all of these different kinds of
observers are represented by generic Forward Observers (FO) or Observation Post (OP) tanks. All of these are tied into the artillery radio net and can control the special missions.
Other types of troops cannot call for fire from the higher echelon assets or call the special patterns.
Basic Brigade Level Fire Support
One of the results of the reorganization of British artillery was the standardization of artillery support. The British ORBAT lists standard infantry and artillery organizations for the Commonwealth forces. An infantry division usually had 3 infantry brigades (BG-05) and the standard artillery support for each brigade was a Field Regiment (FSE-03) which consisted of 3 batteries of artillery.
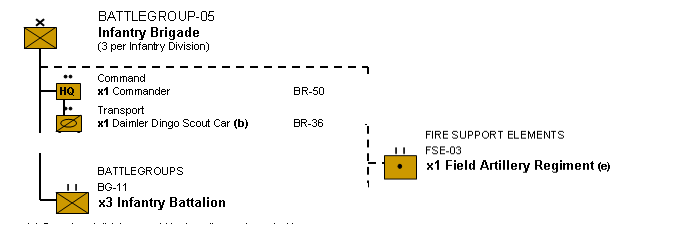
 The type of artillery in the FSE-03 was standardized to the Ordnance QF 25 pounder field gun, an excellent 88mm artillery piece with a high rate of fire. In BF, a single template of 25-pdr artillery (representing 2 tubes) places a Large template with a base attack strength of -1 vs V targets and 0 vs T,G, and sV targets.
Battery Organization
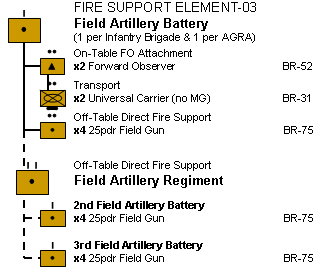 A battery of 25-pdr artillery consisted of 4 BF templates (8 actual tubes). Each battery was assigned two Forward observers (FO) each of whom commanded a half-battery (2 templates) or "Troop".
Each of the 3 batteries in the field regiment was usually assigned as direct support to one of the 3 infantry battalions in the brigade, but the 3 batteries are all part of the same regiment. Any FO could call for fire for guns from the entire regiment as a " Mike" fire mission.
Typical tactical employment was for each of the two FOs to be attached to the lead two Infantry Companies in the Battalion, while the Battery Commander (not normally represented in the game, but see the special rules below) would attach himself to the Infantry Battalion HQ. When attached to Armoured Regiments the FOs would be mounted in OP tanks of an appropriate type (see British TO&Es).
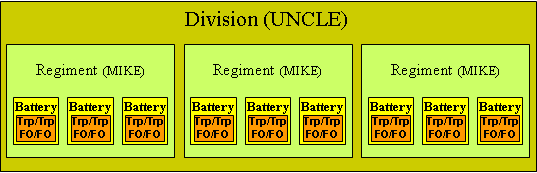
Divisional Artillery Heirarchy
Each infantry division usually consisted of 3 infantry brigades. As each infantry brigade had a Field Regiment assigned to it, the division had 3 Field Regiments available. This led to the following hierarchy of artillery for the division. Note that it was possible for all of the guns available to the division to be called down as a single "Uncle" fire mission:
British Divisional Artillery Templates (25-pdr)
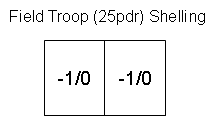
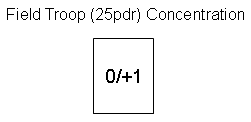
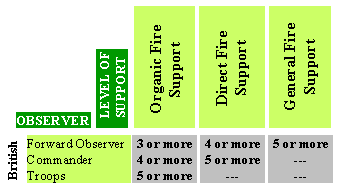
The basic building block of the British Field Artillery is the "Troop" of four guns (2 BF templates). Troops could either fire shelling missions or concentrations. A FO calling for fire from his own troop would typically call for Organic Fire Support.
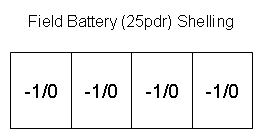
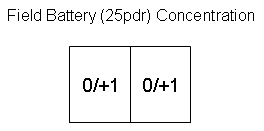
The two troops were organized into a battery, which could fire as a single mission. When Firing by Battery, either a shelling or concentration pattern could be chosen. This may be called by either FO as Direct Fire Support (obviously only one of the two battery FOs may call for fire in that turn).
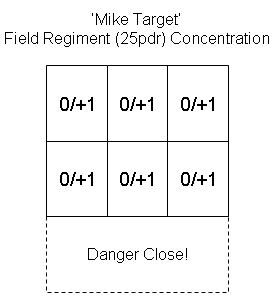
If a target of sufficient value was detected, then all the guns of the field regiment (24 guns) could be brought down in a "Mike" pattern as General Fire Support. Note that in Mike and all of the higher level patterns, only concentrations are used. This means that a Mike pattern of 24 actual tubes (12 BF templates) covers only 6 BF templates. Also, as mentioned in the introduction, some accuracy was exchanged in return for quick response times, so there is an automatic Danger Close with all "Mike" and higher-level British artillery concentrations. For Mike patterns, this is one template deep, but "Uncle" and higher concentrations will have an automatic Danger Close depth of two templates.
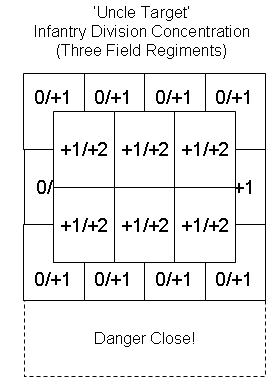
Even more important targets could warrant an "Uncle" mission, which brings down all of the guns (72) from the 3 field regiments in one attack. Rather than spreading out to cover 18 templates, the Uncle mission covers a 4 wide x 3 deep area and the center of the pattern is "thickened" with higher attack values.
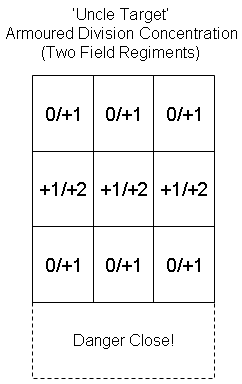
Some divisional organizations (especially armoured divisions) were supported by only 2 field regiments instead of 3. Up through Mike, the missions were the same, but the Uncle pattern had fewer guns. Here is an Uncle pattern made up from 2 field regiments. Two regimental concentrations overlap in the centre, resulting in higher fire values.
Other Common British Artillery (AGRA)
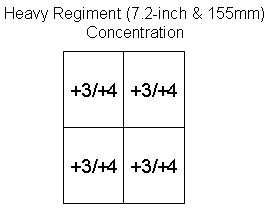
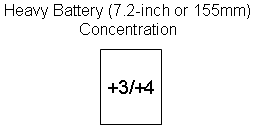
Although the 25-pdr formed the basis of the standard artillery support, many larger guns were available and may occasionally show up in BF scenarios.
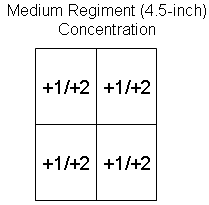
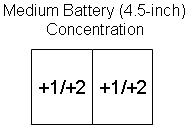

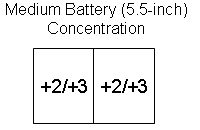
Medium Regiments generally used 5.5-inch inch guns, although occasionally 4.5-inch guns were used. Medium Regiments consisted of 2 batteries of 8 tubes each. While 8 tubes would normally result in 4 BF templates/battery, Medium Regiments were important assets that were not generally assigned to shelling missions, except perhaps in pre-specified fire plans. If the target is large enough to warrant a medium regiment, it also warrants a concentration. This means that Medium batteries will usually only appear as concentration patterns.
Competing for Assets
IntroductionThe scenario designer should keep in mind the limitations outlined on our Notes Section below for the larger missions and also look at the organizations to which the FOs are attached.
Each Troop FO has the full authority to control his troop and select targets for that troop as Organic Fire Support.
Each Troop FO may also call for a Battery shoot as Direct Fire Support. This means that the two Troop FOs in the battery are competing for the same assets. The player must therefore decide which of the two FOs will cease fire for that turn.
When the call goes out for MIKE and larger missions, FOs will again be competing for the same assets. The normal way of resolving this is to put the entire regiment in General Support to a Troop FO. If you use a MIKE or an UNCLE, all of the assets from the regiment are devoted to the mission and only one of the regiment's six FOs can direct a fire mission that turn.
The British often resolved conflicts between FOs in the same regiment at the regimental command level. In a Battlefront Game, there should be one player in charge of resolving these conflicts to decide who gets the MIKE and who doesn't get to shoot.
Alternatively, allow one player to request the MIKE or UNCLE while the other batteries place their templates normally. Resolve the larger request first. If the general support roll succeeds, resolve the larger mission and pick up the other templates from that regiment/division. If it fails, roll normally for the other missions. Also, see the optional rules below.
Firing by Troop-Using Commanders
IntroductionAs mentioned above, the FOs and Battery Commanders worked very closely with their associated Infantry Battalions (to which they were permanently assigned and often got to know very well indeed). Consequently, Company and Battalion Commanders may call for Direct Fire Support, which includes Troop and Battery fire missions. Occasionally a scenario rule may also permit this to include 'Mike' targets.
British Artillery Options
Introduction- Although our basic organization allows for 1 FO for each Troop, there were often other artillery battery and regimental commanders, aircraft spotters, AGRA FOs, etc. who were also trained to act as artillery observers and can reasonably be added to a Battlefront scenario to give the British extra artillery flexibility. If you add extra observers, specify which assets they can control and what support level they can use.
- Although Troop FOs could request a Mike or higher level mission, they might be competing with other requests for fire. We simulate this by having Mike and higher level missions require a General Support roll. However, higher level officers sometimes functioned as observers and they had the authority to override competing requests. It is perfectly reasonable for a scenario to specify that a specific FO stand has that authority. In that case, the observer can call in the higher level strike with a single Direct Support roll. This would especially true if an AOP (Aerial Observation Post) were available.
- Very occasionally a Medium Regiment might be directly under the command of a battlegroup or specific AGRA observer (such as an AOP) and might be the only artillery support available. This was most common where formations had very little organic artillery (such as in the case of Airborne Divisions or Special Service Brigades), or where the formation was operating beyond the range of 25pdrs (such as in a rapid advance or reconnaissance or airborne operation) or for a number of other reasons - it did happen! Other oddities might be a Royal Naval observer attached to Commandos with purely naval guns under his control. In this instance, treat these assets in the same manner as a regiment of 25pdrs, simply substituting the higher values.
- Only trained FOs can call in General support and if the observers all become casualties, the British may lose the ability to call in MIKE and UNCLE missions. However, in the British system, regiments had a pool of 'first reinforcements' which included a Captain as well as more junior officers, and in if an observer became a casualty the Battery Commander would order one of the gun position officers up to the line as a replacement. On the first friendly player turn after an observer becomes a casualty roll a d10. On a 1, a replacement FO and appropriate transport becomes available on the friendly map edge. Keep rolling every turn, increasing the chance of success by 1 until the replacement arrives. Of course the original casualty will count for victory conditions and morale purposes even if replaced.
- While most Observers in our system are attached to specific organizations, the British did allow Observers to call fire from other organizations. To simulate the problems of coordinating such fire, treat all such requests as General Support.
- Commanders of Royal Artillery Anti-tank and Anti-aircraft Batteries were also trained as Forward Observers, and could call fire from off-board artillery if necessary. Allow them to call fire using General Support rolls.
Pregame Fire Plan
IntroductionWhile the emphasis in Battlefront WWII is on firing at "targets of opportunity", the British were masters of pre-planned fire and you should always think about giving them a fire plan at the start of the game. Here you are free to use any missions, add in massive artillery from the AGRA, combine concentrations, moving barrages and lifting barrages to your heart's content.
A good way to do this is to have several turns of preplanned fire in which the artillery designated for direct support takes part. After the fire plan is completed, or if the British player aborts it, the extra artillery drops away and you are left with your standard supporting elements.
Although pre-planned fire should be inflexible once it begins, you can make the plan itself quite inventive. Moving Barrages can change direction, lift for a turn and then begin again, concentrate and then spread out, etc. All of these things must be prespecified, and should be done without a detailed knowledge of the enemy dispositions. You can violate some of the standard rules when planning a barrage. For example, all of the batteries of a regiment can perform a shelling attack (instead of just one). Once the preplanned fire is completed, you revert back to the standard rules.
Remember not to overdo it in your scenarios as it can easily overbalance the game. The typical duration for a barrage should typically be 2 or 3 turns; 4 at the absolute maximum and only one if the guns are short on ammo, plus one turn of smoke. Remember that these barrages require A LOT of preparation and ammunition and that gunners get tired. Also remember that the artillery firing the preparatory barrage might not be available for some time afterwards to fire emergency Defensive Fire (DF) missions such as 'Uncle', 'Victor' etc... possibly not even in the same scenario!
The typical building block of the barrage was the regimental 'Stonk'. This equates to a concentration roughly 500 yards wide (6 by 1 templates at 0/+1 or 6 by 2 templates at -1/0). Some divisions preferred a wider 'Stonk' of 1,000+ yards (12 by 1 Templates at -1/0), so the choice really is yours. Regimental Stonks will always have an automatic 'Danger Close' zone one template deep. These Stonks would often be combined to form a rolling or lifting barrage (maybe with a 'box' around the target area to catch units leaving/reinforcing the area). The Medium and Heavy Regiments would typically fire standing concentrations on likely or known strongpoints.
The intention of the Barrage was to suppress the enemy, not necessarily to destroy him. The infantry therefore were ordered to 'Lean In' to the rolling element of the barrage as close as they dared, in order to be on top of the enemy before they recovered. Inevitably this required the infantry to accept some casualties from 'drop-shorts' (i.e. our automatic 'Danger Close' zone).
Note that the deeper your Stonk is, the quicker your barrage will roll forward.
Here's an actual example, taken from the well-known breakout by the Irish Guards Group from the Neerpeldt Bridgehead at the commencement of Operation 'Market-Garden':
The rolling barrage comprised two parts: The first was fired by the 25pdrs of six Field Regiments - 147 (5 AGRA), 74 (50th Division), 94, 112 & 124 (43rd Division), plus the Dutch and Belgian Independent Batteries. Note that the remaining two Field Regiments of 50th Division and the two Field Regiments of Guards Armoured Division did not fire, as they were mounted up, ready to move north with the column. This initial part of the barrage equated to a block 13 templates wide by 6 deep, with a combat value of -1/0, rolling forward along the highway for four turns.
The second part of the barrage was fired simultaneously to the first, but just beyond it, falling into thick woodland and the likely main line of enemy resistance. It comprised 7, 64 and 84 Medium Regiments (5 AGRA) and equated to an area 8 templates wide by 3 deep, with a combat value of +1/+2, rolling along the highway for four turns.
This is just one example, but there are countless variations on the theme. Note that the barrage here was actually quite light in terms of combat values, as it was designed to roll forward rapidly (leaping six templates at a time in game terms) to allow the armour to forge ahead (in the actual event it proved to be TOO fast). A slower infantry assault might therefore require the artillery to be slower, but more concentrated... You decide.
The Far Eastern Experience
The new artillery doctrine was employed by Slim's 14th Army in Burma late in 1943. However, it was not always easy to implement for reasons that are reasonably obvious:
25-pdrs were relatively rare in Burma (usually only one regiment per division) and were tied to motorable roads. This means that they were frequently not within range of where they were needed. The mobility problem was largely solved by the use of large numbers of Mountain Regiments (usually one or two regiments per division), equipped with mule-packed 3.7-inch Howitzers and by Jungle Regiments (one in most divisions by 1944), which employed a mixture of 25pdrs or 3.7s and large numbers of 3-inch Mortars. However, these weapons lacked sufficient range to be mutually supporting and frequently the directly-attached battery of 3.7s or mortars were the only artillery support to be had by infantry in the jungle.
In NW Europe and Italy the problem of range would be rectified by long-range 4.5 and 5.5 Mediums, but these were extremely rare indeed in Burma due to their very serious mobility and logistical requirements. This role had to be filled by air power, which became integrated with the Army to a degree unseen outside the USMC.
The problems were also exacerbated by communications, where jungles, mountains and damp all conspired to make radio communications extremely difficult indeed.
In 1945 and the breakout onto the Burmese Plain, these problems became less significant and large concentrations of artillery finally became possible, with SP artillery in the form of Priests also playing its part.
Consequently, until 1945 you should only allow 'Mike' targets in tight, defensive battles (e.g. defending a Brigade 'Box') and then only as General Support and never as Direct Support. Sometimes even battery missions should be considered 'General' - particularly as there was frequently not enough artillery to have one battery supporting each battalion. 'Uncle' missions should not be allowed until late 1944 and then it would be a mixed bag of calibres and template sizes. 'Victor' would simply be an 'Uncle' thickened by maybe a single battery of 5.5s.
Notes on using British Artillery - Mission restrictions
Artillery use should be tailored so that it doesn't overwhelm the scenario. Here are some suggested restrictions:
- UNCLE MISSIONS and above
- Allow the British player only 1 or 2 Uncle missions for the entire game.
- To call an Uncle mission, the player must use a forward observer (not a commander or troop)
- A spotted target is required for an UNCLE mission unless it is part of a scenario specific pre-registered Defensive Fire plan.
- The player must declare that he is calling for an Uncle mission before performing the call-for-fire roll.
- Uncle missions require a successful roll for General support. If it is not successful, an ordinary concentration mission will arrive.
- 'Uncle' Targets and higher were usually employed where a 'Mike' had already been used yet German attacks were still coming in. Therefore, it might be an idea to require a Bracketed 'Mike' to be in place before an 'Uncle' can be used (but do not apply the 'Bracketed' +1 call-for-fire modifier).
- MIKE MISSIONS
- Mike missions require a spotted target.
- Mike missions require a forward observer (not troops or commander).
- Mike missions a successful roll for General support. If it is not successful, an ordinary concentration mission will arrive.
- Unlike UNCLE missions, there should generally be no restrictions on the number of Mike missions that can be called.
As can be seen from the explanations above, the 'Mike' and 'Uncle' missions can be quite effective. However, there were even higher levels of artillery 'Stonks' - 'Victor', 'William', and 'Yoke'. Victor missions were the divisional artillery, thickened by the Corps' AGRA. The William mission consisted of every AGRA in the Army firing at the target, plus any available 25pdrs in range. The Yoke mission crossed Army boundaries and was basically every single gun within range, including US Army and naval assets (if they were available). However, these super-heavy concentrations should appear on the Battlefront WWII game table rarely, if ever, as they require an immense ammunition expenditure, extra planning, and are not normally appropriate for the basically tactical scale of our game.
While a few historical examples can be cited of 'William' or 'Yoke' missions being employed in defence of a single British battalion, they were usually interdictive in nature, falling upon the enemy forming-up areas which would normally be off-table and outside the normal scope of a BF game. It is also worth mentioning that in each historical instance they utterly routed the German attacks - so not much of a game!
Here is a sample template for a Victor Mission:

Sources
IntroductionFor an exhaustive look at British Artillery practises, check Nigel Evans' awesome Royal Artillery page. Also note that Mr. Evans contacted me and with his permission I have liberally quoted and paraphrased him and his site on this page and on the French/Blitzkrieg page. My apologies to Mr. Evans for any inaccuracies I have introduced.
I would like also to thank the incredibly prolific R. Mark Davies, who added lots of ideas and details for the use of British artillery in Battlefront Games, including the template patterns for the various missions.
Next Tutorial (U.S. Artillery Doctrine)
Previous Tutorial (Russian Artillery Doctrine)
Tutorial Table of Contents