Battlefront WWII
Fighting in towns
Fighting in towns
Introduction
I want to thank all of the forum contributors who added ideas for this page.Towns in Battlefront are represented by three types of terrain:
- Streets - generally much like woods in their effect on movement, spotting, and combat.
- Rubble - like woods for spotting, but slow down movement and provide hard cover.
- Built up sectors - unique in their effect on movement, spotting, and combat.
Here are some of the ideas that apply to BUS that are different from other terrain:
- BUS block LOS within the dense terrain of the town. The max LOS of 4" in dense area terrain is interrupted by the BUS.
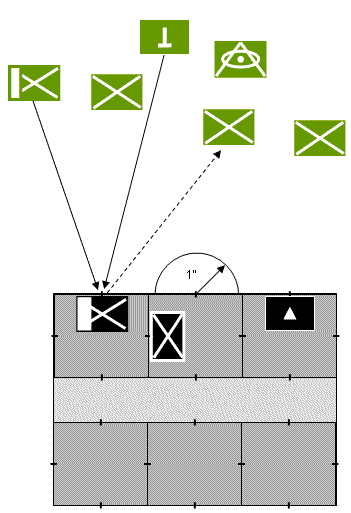
- A unit in a BUS must be conformed to one of the aiming points of the BUS and traces its LOS from that aiming point. While it is considered to occupy the entire sector, potential spotters must be within 1" of the other 3 aiming points or in an adjacent sector to see it. In effect, unless you are looking at the front aiming point, the unit is deep in area terrain.
- Units in BUS cannot be enfiladed (p.35 - end of the enfiladed section)
- Units in BUS get an advantage in close combat (p.56)
- Units in BUS cannot be outflanked in Close Combat (p.56), but a foothold modifier is possible if you attack from an adjacent sector.
- Vehicles cannot enter BUS and, with some exceptions (flamethrowers), cannot close assault into them either.
Urban Defensive Ideas
Contemplate your inner self
The intuitive placement of troop units in BUS would have them conform to the edge of the BUS that faces out into open spaces. While this gives you
a LOS, it is similar to placing troops on the edge of woods. They can see out, but as soon as they fire, they are suspected by any unit with a
clear LOS to the aiming point. By facing sideways or backwards, you sacrifice your LOS and 2-5" range band into the open terrain. However, you will get
ambush fire when enemy troops approach within 1". Even though you are firing to the rear, the first time you fire ambush fire will give the average infantry unit a +2 attack (most
infantry is +2 at 0-2, -1 firing to rear, +1 ambush. Since you cannot be outflanked or enfiladed, all you sacrifice is long range fire and a +1 modifier in the close in band. You gain immunity
from longer range fire.
Units that should set up facing the open are those that want to use their range. FOs definitely want to do this, as they don't reveal themselves when they call-for-fire. HMGs and weapon units also probably want to use their range, as they can usually fire effectively from 5-10. With LMGs and infantry, you need to balance the extra firepower from 2-5 against the increased vulnerability. A unit has only one ambush fire when it is facing outward, as units which can trace LOS suspect it, even if it kills the first wave of units moving up. When facing away from the edge, the enemy is forced to come within 1, and you kill all spotters, you regain your hidden status.
Units that should set up facing the open are those that want to use their range. FOs definitely want to do this, as they don't reveal themselves when they call-for-fire. HMGs and weapon units also probably want to use their range, as they can usually fire effectively from 5-10. With LMGs and infantry, you need to balance the extra firepower from 2-5 against the increased vulnerability. A unit has only one ambush fire when it is facing outward, as units which can trace LOS suspect it, even if it kills the first wave of units moving up. When facing away from the edge, the enemy is forced to come within 1, and you kill all spotters, you regain your hidden status.
Home Improvement
Every defending unit that is not moving or fighting should attempt to improve their position. In stone buildings and rubble, the IP will give an additional
-1 defensive bonus against direct fire attacks (p.32). Also, there is a "down 1" on the spotting chart (p.20) that will prevent troops in
IP from being spotted beyond 1, even if they fire. Note that while IPs also give a benefit when rolling on the maneuver chart (p.45), you get this
while in cover anyway (BUS, streets, and rubble all provide cover), so there is no extra bonus.
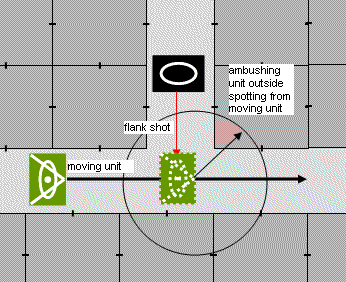
Keyholing
Defending units can use keyholing, which involves a
defending unit taking up a position on a side street(obviously, this works best with hidden deployment)
on a route along which you believe enemy armour are going to advance.
As long as enemy infantry do not get into the buildings next to the unit you cannot be spotted so your opponent does not know you are there until his lead tank gets a flank shot fired into it.
Watch your spotting distances here, remembering that the field of observation is measured from the front aiming point of the moving unit. You want to be sure that it cannot spot you until it moves past and you get your flank shot. Vehicles probably want to go hull-down, reducing the spotting distance by one level. Large units probably want to start 3 1/2" back in hull-down positions. This trick is even better with small AT guns, which are only seen at 1".
Use defensive artillery to disorganize the attack
Defensive artillery is best used to harrass the attacking forces as they are organizing for the attack. If you can prevent one unit from joining the assault, this may be the key to driving off the attackers.Urban Offensive Ideas
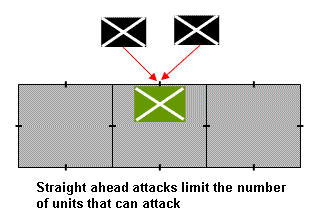
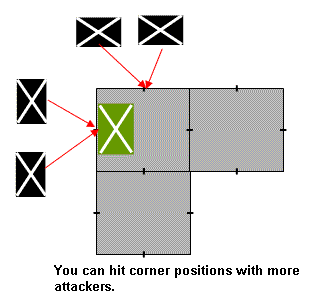
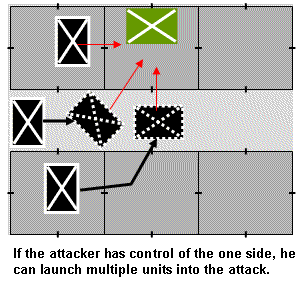
Close assault with multiple units
While it may seem obvious, close assaulting with more than one unit is an essential part of forcing defenders out of BUS. The inherent defensive advantages of BUS, added to the effects of defensive fire, make a 1:1 attack a very chancy proposition.
Smoke 'em if you've got 'em
Much of the fighting in towns is going to be by close combat. The attacker will need to get within CC range to see the enemy, and the only way to attack immediately is to declare close combat. Defenders will be relying on their defensive fire (often ambush) and the inherent CC advantage of BUS to defeat the attackers. Also, the defensive advantages of BUS makes it hard to use direct fire to suppress the defenders. However, you can use smoke on the turn when units assault. It decreases the effect of direct fire by 2 but has no effect on close combat. This may allow the attacker to get in close without being unduly damaged by defensive fire.Note that once you get into the town, laying smoke is a good use for company mortars. Often these are organic to the unit doing the assault and even troops can call in fire (you need a spotter for the fire mission with a LOS to the intended target). Also, small mortars (5cm and less) can IDF from 2" (note that I just created several errata prototype cards to be consistent on this, especially for some of our earlier cards), so they can move into the town and then spot for themselves in the 2-4" range band (the max LOS is 4" in dense terrain). This can provide smoke at a critical time in the assault.
Soften up the defenders with artillery
Because BUS offer cover, and often you cannot spot units in them, it is very hard to use artillery to kill them. However, dropping artillery, even random fire, into a BU area just before you assault it can suppress or even disorder the defenders. This can give you a critical modifier for the assault.Outflanking does matter
 |
 |
 |
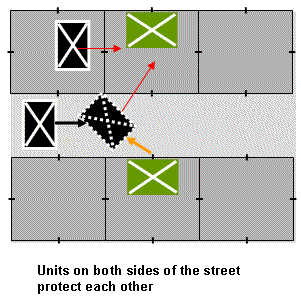 |
In WW II urban fighting in places such as Ortona, the German defence on one side of a street would continually retreat rather than risk being outflanked by the Canadians advancing through the houses on the opposite side.
Other topics
Armor in Towns
Towns are infantry country. If you send your tanks in unaccompanied by infantry, they will be extremely vulnerable to close assault.Because towns are dense terrain, small tanks with weak guns (example - Stuarts) may want to set up back from the edge. This will allow them to use ambush and close range fire without being exposed to long range fire.
Defending and Attacking a town
The following ideas were distilled from several postings by Paul Bernadino on the tactics forum.Ideas for defending-Primarily from Paul Bernadino's post on the tactics forum
A town can be essentially divided into 3 defensive zones, oriented so that they are facing the expected line of attack. The outer most zone or perimeter is made up of the built up sectors that form the edge of the town facing the attacker. The middle zone or main line of resistance (MLR) actual defensive positions is made up of the sectors that comprise the interior of the town. The rear zone or secondary defensive zone are the back edge sectors of the the town. The idea is to slowly withdraw through the town, causing casualties as you go. As the defender has ambush and defensive advantages, it is possible that this type of defense will cause the attacker to stall.All occupied sectors should have improved positions, if you don't start that way, spend every possible maneuver phase attempting to improve.
The perimeter should be occupied by MG squads, and a FO. The purpose of these troops is to engage the advancing enemy with long to mid range fire to strip away or disrupt enemy squads. If the game allows it, the FO can also be used to establish a defensive barrage located within 4-6" from the perimeter sectors, to disrupt the attackers as they start to organize for an assault on the perimeter.
The perimeter is not to be held. It"s purpose is to disrupt the attack, and then to fall back into the MLR or secondary defensive zone where it an then provide supporting fire to troops that try to assault the main defensive zone.
The middle or main defensive zone should be occupied by your infantry squads. They are to be dug out by the enemy in close assault. They should hold their defensive fire until the enemy is close enough to spot them. Depending on the configuration of the town, this is often when the enemy is actually close assaulting.
The reserve or secondary defensive zone is where the reserves and the remnants of the perimeter defenders organize to mount a counter-attack. The relocated perimeter stands should be located so they can fire down streets, and used to isolate sectors in the main defensive zone. The reserves are there to take back the sectors lost in the main defensive zone.
Do not be afraid to call artillery fire down which covers your own troops or may subject your troops to danger close. If you are deployed in dug-in positions, the worst that can happen to you is disorder. Also the attacking troops are usually out in the open, and bunched up. This is what is called final protective fire, and can be very effective and wiping out the attacking troopers when they bunch up to try and close assault your sectors.
The above ideas assume that there are enough sectors for company size defense. If there are insufficient sectors, establish the outer perimeter outside the built up sector in dug-in positions within 1" of the town edge. The troops there can fall back into the town, and not worry about opportunity fire if the positions are within 1" of the the town edge. This is especially effective if the area in front of the town has sparse area terrain, as units dug-in there cannot be spotted outside of 2", even if they fire. The reserve zone can either be the back edge sectors again or another set of dug-in positions within one inch of the back edge of the town.
Attacking a town
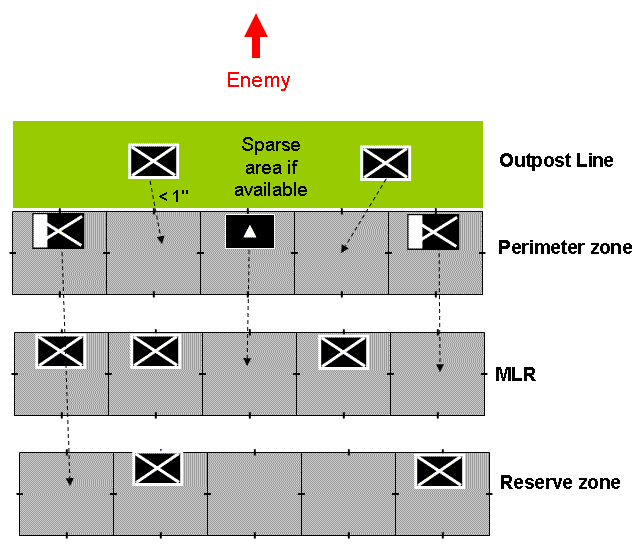 The defense of a town is best described as a layered defense with the
outermost layer being a lightly held outpost layer, a middle layer that forms the main defensive line,
and the innermost layer that supports the middle layer and forms the rally line and the area from which
to launch counter-attacks.
The defense of a town is best described as a layered defense with the
outermost layer being a lightly held outpost layer, a middle layer that forms the main defensive line,
and the innermost layer that supports the middle layer and forms the rally line and the area from which
to launch counter-attacks.
The salient feature of the above defensive scheme is that attacks will be channelled in attacking through the outer layer. Once the point of attack has been determined, the innermost layer can be used to either flank and isolate the attack, or to reinforce an defense by counter-attack.
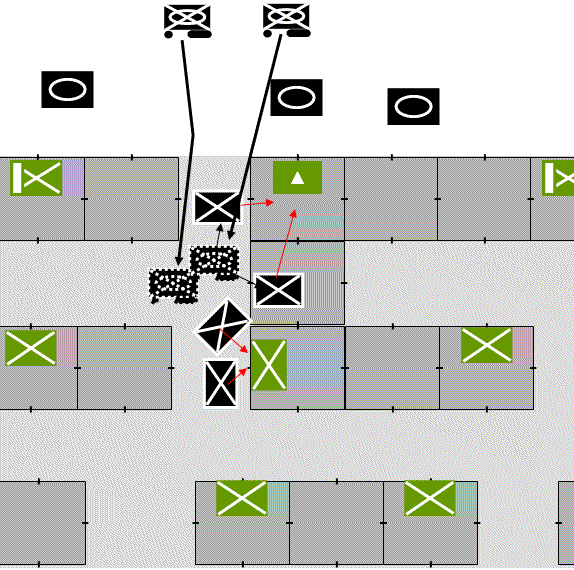
So how do you crack this hard nut. The problem with assaulting a town is that you must either take it in one fell swoop or you run the danger of being tied fown into a battle of attrition. There are generally two methods for taking a town, either a single deep penetration assault or a two pronged assault. Both types of attack have the same objective which is to drive deep into or behind the middle defensive layer. To demonstrate the two types of assault, we will assume an attack by a combined armor and armored infantry force.
Deep Penetration Assault
 In a deep penetration assault, advance on the town with the tanks in the lead, and
the infantry following closely in halftracks. The tanks stop at 4" range from the outskirts of the town, and assume
overwatch positions engaging any enemy units that decide to fire from the town. In the next turn, the armored infantry
drives deep into the town, and the infantry dismounts into the assault. You can use smoke to cover this movement, and also drop some artillery
to suppress the defenders in the hope of reducing defensive fire. The infantry dismounts and assaults, attempting to gain at
least a 2-1 advantage against defending stands, and if possible attack from a foothold position. After defensive fire, you use your
tanks to shoot at defenders who have revealed themselves. Even though they may be only suspected and will be in cover, a suppression will
give you an advantage in close combat. If the close combat succeeds, you will have gained a entry into the town without taking too many casualties,
and you can reinforce with followup units. Also, defenders in the outer perimeter will have a maneuver roll subject to the negative
modifiers for armor within 5". The key to this type of attack is to get deep into the defense and establish yourself
in the middle of the defense. The shock and rapidity of your attack should cause the enemy to become unbalanced (negative manuever modifers),
and possibly abandon his position. The downside with this attack is if your assault wave does not take town sectors in its first attack,
they can get caught in the streets of the town and get slaughtered.
In a deep penetration assault, advance on the town with the tanks in the lead, and
the infantry following closely in halftracks. The tanks stop at 4" range from the outskirts of the town, and assume
overwatch positions engaging any enemy units that decide to fire from the town. In the next turn, the armored infantry
drives deep into the town, and the infantry dismounts into the assault. You can use smoke to cover this movement, and also drop some artillery
to suppress the defenders in the hope of reducing defensive fire. The infantry dismounts and assaults, attempting to gain at
least a 2-1 advantage against defending stands, and if possible attack from a foothold position. After defensive fire, you use your
tanks to shoot at defenders who have revealed themselves. Even though they may be only suspected and will be in cover, a suppression will
give you an advantage in close combat. If the close combat succeeds, you will have gained a entry into the town without taking too many casualties,
and you can reinforce with followup units. Also, defenders in the outer perimeter will have a maneuver roll subject to the negative
modifiers for armor within 5". The key to this type of attack is to get deep into the defense and establish yourself
in the middle of the defense. The shock and rapidity of your attack should cause the enemy to become unbalanced (negative manuever modifers),
and possibly abandon his position. The downside with this attack is if your assault wave does not take town sectors in its first attack,
they can get caught in the streets of the town and get slaughtered.Multi-pronged assault
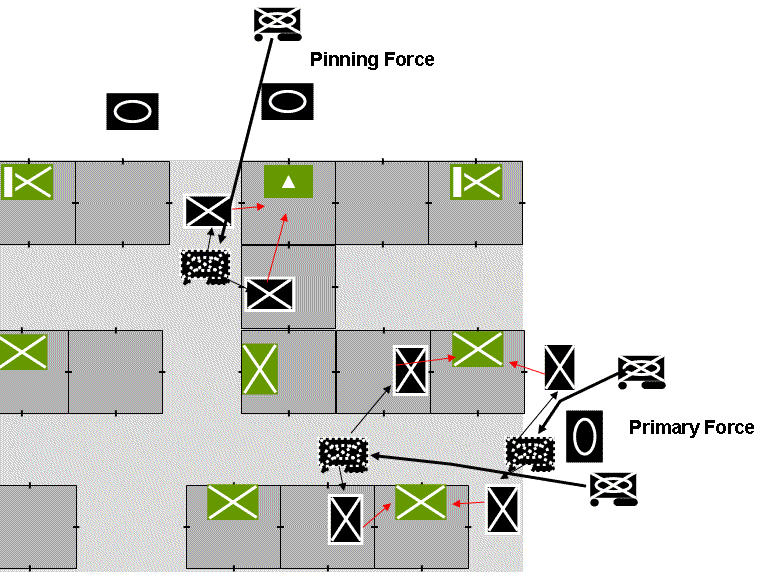 The second method is to attack the town from two directions. The attacking force is divided into
a primary assault and secondary pinning force. The pinning force tends to be armor heavy, while the assault force is infantry heavy.
The pinning force advances to within 4" of the town
and takes up overwatch positions. The assault force advances to take end up to the flank of the town so it is
within one manuever action of the either rear or inner defensive layer. The armor in the flanking force again takes
up overwatch positions. Simultaneously, both infantry components of the attacking forces assaults the town. The pinning
forces objectives are the outer layer of defenses. The primary forces objective is to drive into the center of the town from
the flank. A succesful assault will result in a platoon plus force established in the center of the defenses with another platoon in
support in the outer area. Once again armor located within 5" of the enemy will result in negative manuever table modifiers.
The second method is to attack the town from two directions. The attacking force is divided into
a primary assault and secondary pinning force. The pinning force tends to be armor heavy, while the assault force is infantry heavy.
The pinning force advances to within 4" of the town
and takes up overwatch positions. The assault force advances to take end up to the flank of the town so it is
within one manuever action of the either rear or inner defensive layer. The armor in the flanking force again takes
up overwatch positions. Simultaneously, both infantry components of the attacking forces assaults the town. The pinning
forces objectives are the outer layer of defenses. The primary forces objective is to drive into the center of the town from
the flank. A succesful assault will result in a platoon plus force established in the center of the defenses with another platoon in
support in the outer area. Once again armor located within 5" of the enemy will result in negative manuever table modifiers.When to use the different styles
Use the deep penetration assault if there is an objective that must be secured rapidly, or believe the town to be lightly held. For example, you have to secore a road through a town for the tanks to carry on an assault. It would be time-consuming to secure the entire town, but a deep assault directed at the sectors surrounding the road leading to the objective would be all you needed to secure a route through the town. Remember that you will be selectively trying to kill stands in the innermost layer, and forcing the outer defenders to displace due to manuever modifiers. If you have time to maneuver, the second method is less risky.The deep penetration method is a one shot deal and if not successful can result in rapid decimation of the assault troops in the streets of the town. Also, the deep penetration assault must be supported quickly, the troops holding a few sectors in the enemy town will need to be reinforced rapidly, or the attack exploited quickly; otherwise, it can be subjected to and lose to counter attacks, as it usually lacks the infantry to hold for long.
The multi-pronged assault has its limitations in that it takes time to mount, can quickly turn into a battle of attrition, and it takes time to clear all the sectors. The benifit is that once you gain a few sectors in the town, you are supported and situated in depth in the enemy defenses.
Artillery in the assault
Artillery can be used to support the attack. If you are allowed to specify moving barrages in the scenario time them so that they are first directed against the area where you are attacking and then shift them to town sectors on either side of the attack. The purpose of the artillery is to reduce flanking close range fire from flanking sectors, as well as soften and disorder the enemy stands in the objective.In the two pronged attack, Artillery should be first on the outer defenses, and then shifted to the inner defensive area. Walking barrages are useful in this case, if not available then random shelling directed first at the outskirts of the town and then on the center of town can help. In either case, the artillery is designed not to destroy the enemy but suppress them and limit their ability to effectively defensive fire on assault troops.
Remember to bring spotters along with the assault force, as you need them to establish a clear LOS to where you want the artillery to land.